
Tailwindcssにはダークモードが搭載されています。
筆者もダークモード愛用者なので、これは嬉しいところ。
<html class="dark">
...
</html上記のように、HTMLの先頭のクラスに dark を指定するだけでダークモードが適用されます。
でも、人によってはライトモードの方が好き!という方のためにも、
どちらにも対応できるようにボタンで切り替えて動的にモード変更出来るようにしていきます。
何故かダークモードが適用できない
https://tailwindcss.com/docs/dark-mode
上記の公式ドキュメントを参照すると
@custom-variant dark (&:where(.dark, .dark *));上記のcustomize.css(仮)に入れて、いつもの
npx @tailwindcss/cli -i ./customize.css -o ./tailwind.cssのbashを叩けば適用されるらしい。
やってみたけれど・・・適用されません(泣)
環境の問題なのかもしれないけれど、私の環境では適用されませんでした。
[data-]属性でダークモードに切り替わった
うーん、これは困った。
調べていると同じく動かない!!という人がわんさかいらっしゃる。
調べに調べて、クラスではなく[data-]属性を使えば何とかなるらしい?
@custom-variant dark (&:where([data-theme=dark], [data-theme=dark] *));<html data-theme="" class="bg-gray-100 dark:bg-black">
...
</html>再びbashを叩くと・・・ダークモード適用できましたー!!
公式の方法とは違うけれど、これでとりあえずモード切替の準備が出来ました!
ボタンが押下されたらモードを切り替える
動的に変えるということは、JavaScriptが必須です。
その前に適当にボタンを作っておきます。
    <!-- 現在ダークテーマ -->
    <button id="button-dark" class="right-0 float-right" onClick="toggleTheme()">
        明るくするよ
    </button>

    <!-- 現在ライトテーマ -->
    <button id="button-light" class="right-0 float-right" onClick="toggleTheme()">
        暗くするよ
</button>2つボタンを作って、一方だけ表示するという体で作っています。
次はonClickに書いたJavaScriptです。
// HTMLのdata-themeを差し替え
function toggleTheme() {
  const current = document.documentElement.getAttribute('data-theme');
  const next = current === 'dark' ? 'light' : 'dark';
  document.documentElement.setAttribute('data-theme', next);
  localStorage.setItem('theme', next);

  setButton(next);
}

// ボタンを差し替え
function setButton(theme){

  const next_id = theme === 'dark' ? "button-dark" : "button-light";
  const before_id = theme === 'dark' ? "button-light" : "button-dark";
  const next_button = document.getElementById(next_id);
  const before_button = document.getElementById(before_id);

  next_button.classList.remove('hidden');
  next_button.classList.add('inline-block');
  before_button.classList.remove('inline-block');
   before_button.classList.add('hidden');

  //コンテナの色も変更
  const containers = document.querySelectorAll(".container");
  if (!containers) return;
  containers.forEach(item => {
    item.classList.toggle("bg-black",theme === "dark");
  });
}setButtonに書いたコードが汚いですがお許しを(汗9
これで、ボタンがクリックされたら、もう一方のボタンを表示させて、
テーマを変更するというロジックが出来ました。
何故かわかりませんが、コンテナの色が変わらないので、ここで一緒に変更しています(汗)
デフォルトのテーマの取得+ローカルストレージに保存
ボタンをクリックされた時にテーマを変更されるロジックはできたけれど、
ユーザーのデフォルトテーマを取得して、サイトに初めてアクセスした時は、
それを適用するようにロジックを追加していきましょう。
また、現在表示されているテーマをローカルストレージに保存して、
次にアクセスした時はその値からどちらのテーマを初期表示するかを判定します。
//テーマを変更
function setTheme(theme) {
  document.documentElement.setAttribute('data-theme', theme);
  localStorage.setItem('theme', theme);
}

//テーマを初期化
function initTheme() {
  const saved = localStorage.getItem('theme');
  const prefersDark = window.matchMedia('(prefers-color-scheme: dark)').matches;
  const theme = saved || (prefersDark ? 'dark' : 'light');
  setTheme(theme);

 //ボタンを差し替え
  setButton(theme);
}

initTheme();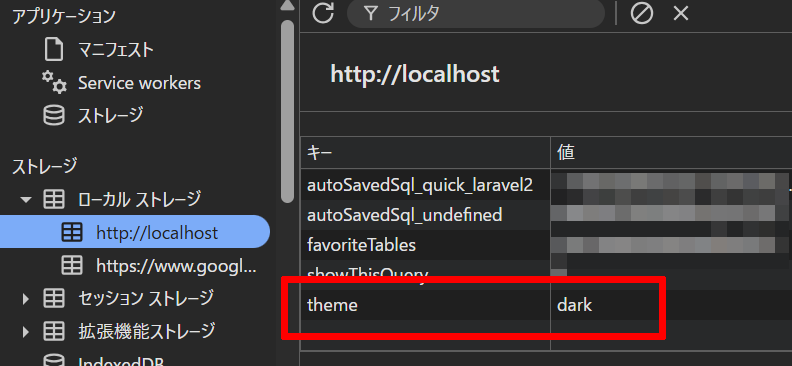
DevToolで確認すると theme に値がセットされているのが確認できました。
これで完成です。